This technique is perhaps the most fun you can have when fishing for carp and arguably the most versatile, especially when fishing anywhere between the margins and 10 to 15 yards from the bank. there is nothing quite like seeing the float slip away under the surface and then see the water erupt when you connect with the carp!
We can of course use any rod and reel lying about in our garage to float fish for carp but an 'all through' action rod is the best choice as the initial run of the fish will be very powerful and this softer, more forgiving rod is probably our best choice. But again, with the many years of research and development having been done by specialist anglers and companies in this department, we can refine our approach to utilize many of the successful techniques that have been developed to increase our catch rate. It must be said though, longer rods in the 10 to 12' range with the 'through' action will give you much better line and float control; you'll find that you actually connect with the fish more often and not miss as many bites due to slack lines etc. So, to reiterate, the longer the rod, the easier it is to pick up and retrieve slack lines and thus being able to set the hook faster when a fish bites, especially on a river.
Here in our examples, we'll start off with the basics and add to this article in the coming months and years from our combined knowledge about the techniques available.
THE FLOAT ARMORY WE HAVE TO CHOOSE FROM AT THE OFFICE WHEN CARP FISHING.


As in any type of fishing, it’s important when float fishing to choose the areas of your lake or river where the fish actually hang out to feed. So as usual, we're looking for underwater structures such as weed lines, points, river mouths & feeder creeks, drop offs, rock piles etc. to find our quarry.
Once you've chosen your spot, if you live in a state where pre-baiting/chumming is legal, it’s always beneficial to pre-feed the area before you actually fish whenever possible. This could be the night before your session and/or as soon as you arrive at the swim, before you set up your tackle. This is best done with small, correctly prepared particles such as Hemp Seed, Canned Sweet Corn, Wild Bird Seed and grated bread crumbs work fantastically (loaf of bread ground up in a blender). The ever-wary Carp, will readily accept a hook bait once they have sampled your free offerings and gained confidence on the free offering of the food that is also being used as a hook bait.
Any of the above baits will work well either directly on the hook or even better via a hair rig described earlier in this "European Styles" section. Of-course, boilies, chickpeas, nuts, dough baits, cheese, worms/night-crawlers and maggots/spikes are always big favorites too. We recommend that bringing 3 or 4 different baits to your session because the fish could favor one over the other on any given day.
FLOAT FISHING RIVERS, PONDS & LAKES
There are differences in approach and slightly different techniques that should be considered when Float fishing rivers as opposed to still waters such as lakes and ponds.
The main challenge when fishing a river as opposed to still waters is of course the flow or movement of the water. We must adjust a few things with our approach, techniques, and rigs to compensate for the flow.
When fishing a river, throw your pre-bait slightly up-stream of your chosen fish holding feature so that it settles down on the bottom in your swim you plan to fish. How far up stream to introduce your bait will of course, be determined on how fast the river is running. Also, bear in mind that different sections of the river will be running faster or slower even in the vertical plain (The surface of the river could be running slower than the flow of water at say, 8 feet below the surface). Cyprinus Carpio have an awesome sense of smell and the 'scent' of your bait will be carried off downstream and attract carp up to your area. Keep it going in, little and often.
It is a good idea to mix some of your chosen bait(s) in with a binder such as bread crumb for example in a bucket and make sticky balls to pre-bait with; see the following link for one of our favorite mixes: The Method Some experimentation will soon tell you how firm, 'stodgy and thick' to make it. In faster flows, you should make it so it takes 15 or even 20 minutes to completely dissolve/break completely; this acts as both a delayed and controlled bait delivery system for your swim.
Where as in still waters, a quick (less than 2 minutes) dissolve/break is desirable. Grits or oats that are wet with a can of creamed corn work very well in here because the smaller particles in these mixes will stay in position until a fish eats them and of course the pre-bait can be thrown directly to the structure or mark that we have decided to fish.
+ READ MORE
Now lets tackle up and discuss a few general pointers while we let the pre-bait work it's magic:
- Monofilament and/or fluorocarbon main lines in the 6 to 10 LB test range are suggested when fishing for carp. Often, a leader or hook length is between 6" to 18" is used at the business end of the rig; attached via a line loop or mini swivel. This hook length is often, a fluorocarbon line and much lighter test line in the 4 - 6lb range to give a more visually subtle bait presentation to wary fish...
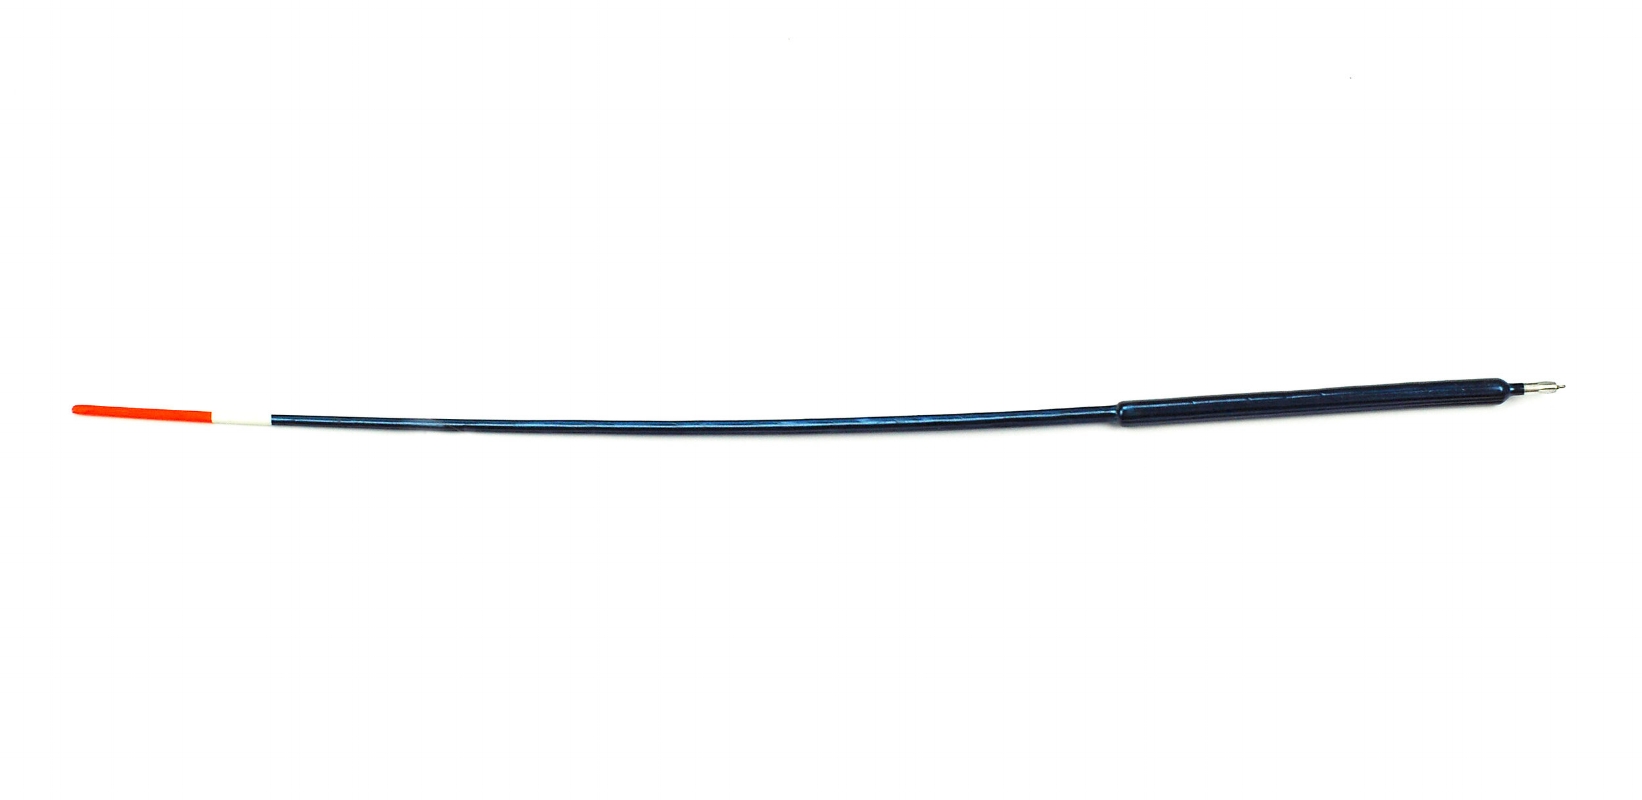
- Depending on how far we must cast to reach the shoals or feeding spots, use as small and sensitive a float as your fishing conditions and swim will allow. A thin bodied float such as a Waggler, Stick Float, carp antenna or even a good-sized quill (if you can find one) as these types of floats offer much more stability and sensitive bite detection than conventional 'bobber' floats.
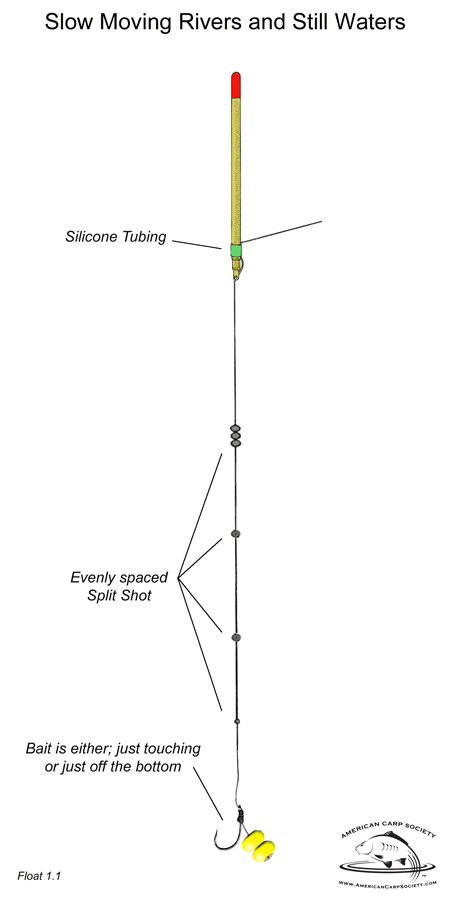
- Attach the float to the line by threading the main line through the eye at the bottom of the float and then thread a piece of silicone tubing onto the line and push it up and onto the bottom of the float (See diagram below).
- If no soft silicone tubing is available, the line can be passed through the bottom eye of the float twice to semi secure the float in place. This is not ideal though because the line can be damaged and thus weakened whenever the float rig's depth is adjusted.
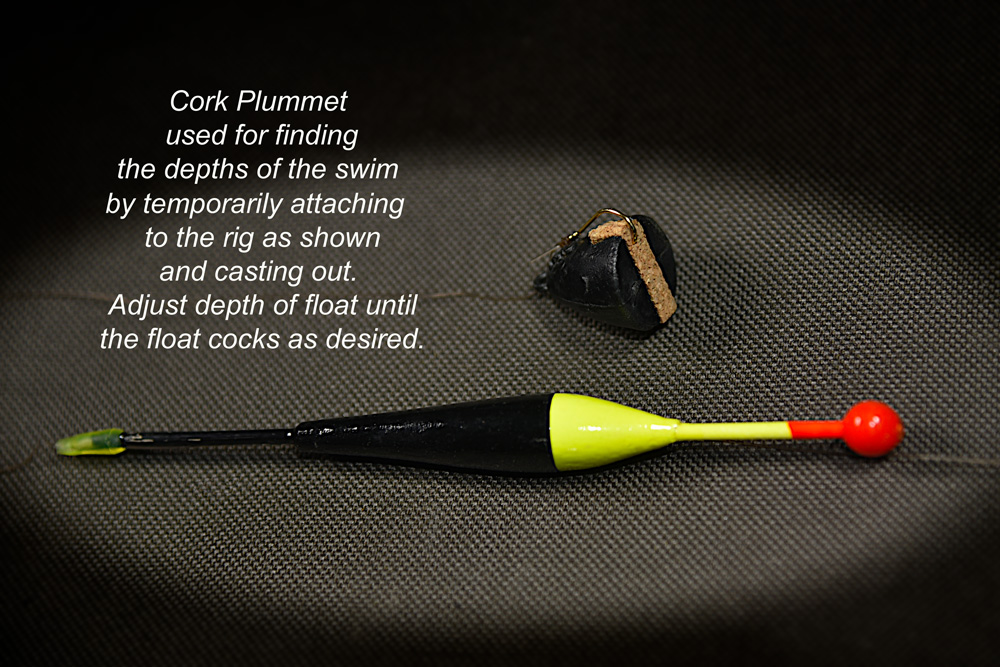
- Important! In all float fishing styles and approaches, it is extremely important to first find the depths of your swim using a purpose made Cork Plummet or by tying a large enough weight to the end of the line to easily sink the float. Repeatedly cast to the area you plan on fishing and keep raising the float up along the line each time it's cast and submerges until the float is at the required depth and is cocked perfectly in the water. We now have the full depth of the water we plan to fish; note the depth by holding the float against the rod with the hook at the bottom of the rod butt and make a mental note of how many of the rod's eyes the float is so you can easily reset the float to full depth as needed during the session.
- In rivers, allow a little more depth (distance between the float and the hook) on the rig than you would on a still water, especially when fishing your bait on the bottom and 'trotting' it downstream. This is to allow for the bow in the line caused by the current. Once we have the depths mapped out throughout the swim, we can then choose which float rig to use.
FLOAT RIGS
The float set-ups pictured below are very general in nature but will get us through most situations we are likely to encounter in our float fishing pursuits of Cyprinus Carpio. Whether you need your bait well up in the water column or hard on the bottom of the river/lake, one of these or indeed a combination of the rigs, will make our quest that much more successful.
There is a whole science built up around split shotting patterns for floats but it really all boils down to the following:
- The end goal is of course, weighting our float rig so that it helps present the bait on the hook in as naturally looking a presentation as is possible to the hungry fish in the swim they happen to be feeding. This is especially important with the wary carp!
- Most good floats that are commercially available these days have a shot or weight rating guidance printed on them. Some floats are even self-weighed. For example: 2AAA, 2BB, 2AA+ etc. The lettering refers to the size of shot and the number, to how many of them are needed to properly cock the float. Other sizes include, SSG (aka Swan shot), No.1, No.4, No.6 etc. More modern references are given in grams but both size references are commonly seen on packs of mixed size split shots. If casting your float rig to a distance more than a rod length or two is necessary, try to avoid using the split shot with 'ears' even though these are easier to both install and remove from the line. They tend to spin on retrieval and can cause twisted line and tangles.
- The trick is to place enough weight on the line (via strategically placing split shots on the line) to correctly cock the float so just the colored tip (red in the above examples) of the float shows above the water while at the same time trying to achieve a natural looking and acting bait presentation. Evenly spaced shot tends to cast better than shot clumped all in one or two places but even these 'clumped' shotting patterns can have their place depending on the fishing conditions we're fishing in.
- If we need the baited hook to sink quickly to the bottom of the lake (maybe to by-pass, smaller fish feeding in mid-water) then place some of the larger split shot down nearer the hook.
- If a more natural sinking action of the bait is needed, then place the bulk of the shot up closer to the float.
- In the last two points above, some care should be taken to place the shot on the line so that tangles are minimized during the casting of the baited float rig. Evenly spaced shot tends to cast well. Experience is the best way forward.
+ FLOAT 1.1
THE SLOW MOVING RIVERS AND STILL WATER 'WORK-HORSE' FLOAT RIG
This is a very typical float rig set-up that can be used in most any situation with success. The design of the float used can be changed as well as the hook size and breaking strain of the line to suit various swims but this is our 'work horse' rig. When fishing rivers, it is best to fish slightly over depth to take into consideration the bow in the line between the hook and the float that the current will cause.
+ FLOAT 1.2
THE LIFT FLOAT METHOD
Used for presenting a bait on the bottom of the lakes and other still waters. Can also be used on slow moving rivers but the use of a more buoyant float like the Peacock Waggler shown in Float 1.4 is recommended.
This rig and approach probably suits carp fishing better than any other due to the way in which a carp typically feeds. As all Carp on the Fly Fishermen can attest, carp can often be seen with their tails up and heads down when feeding on the bottom of the lake, sometimes even looking like they're standing on their heads. This same feeding pattern is also the norm at depths where we can't see them, so knowing this and being able to visualize them feeding on our hook bait is an obvious advantage to us. Once the bait has been sucked into the carp's mouth, the fish then moves to a more horizontal position to chew its food.
This is how we get the term "Lift Method" because the carp, in moving to the horizontal plane to chew the food, lifts the Split Shot that properly cocks the float up off the bottom with the bait, so the float then pops-up and can even lay flat on the surface. The time to quickly strike and lift into the fish is when we notice the initial lift of the float before it spits the bait. This is why it is very important to only have a 3-inch (4" maximum) length of line between your hook and the split shot that both cocks and anchors the float. Any longer and the bite will probably not register on the float and the bait will be 'spit' as soon as the carp feels the hook and realizes something 'isn't right' with the bait.
Note: Watch out for the following occurrence when using this rig - Occasionally, if the carp keeps its head down when feeding confidently, then moving directly onto the next item of food close-by, the float may 'bob' slightly before sliding off into the depths. Strike!

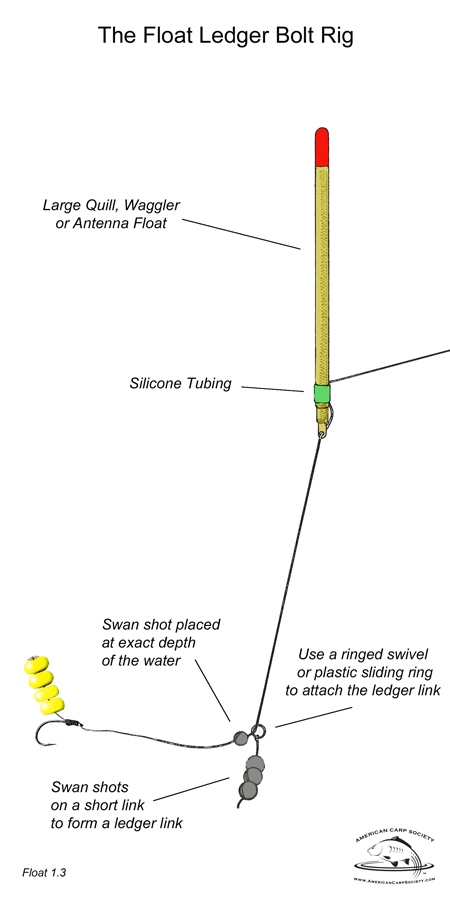
+ FLOAT 1.3
THE FLOAT LEDGER BOLT RIG
The main advantages to using this method is that it can be cast long distances with a float and into to areas where a regular ledger rig (described at the top of this Euro-Styles section) is not practical. For example: fishing in a hole where there are plenty of rocks or weed beds on the bottom or floating lily Pads etc. in between the angler and the baited rig thus making it impossible or impractical to sink the line to get even a semi tight line for good bite indication via the bite alarms using a regular ledgered approach. This float ledger rig allows a semi-tight line between the rod tip and the float along the top of the water and thus over the top and out of the way of the snags below, thus seeing a positive bite indication via the movement of the float. We can then immediately lift into the fish as soon as the float indicates a fish has picked up the bait.
This float ledger set-up is also great in very windy conditions and you want to present a bait tight to a mark you have established and pre-baited. The only other tip we feel is necessary here is to make sure that enough of the float tip is visible when fishing this at distance.
+ FLOAT 1.4
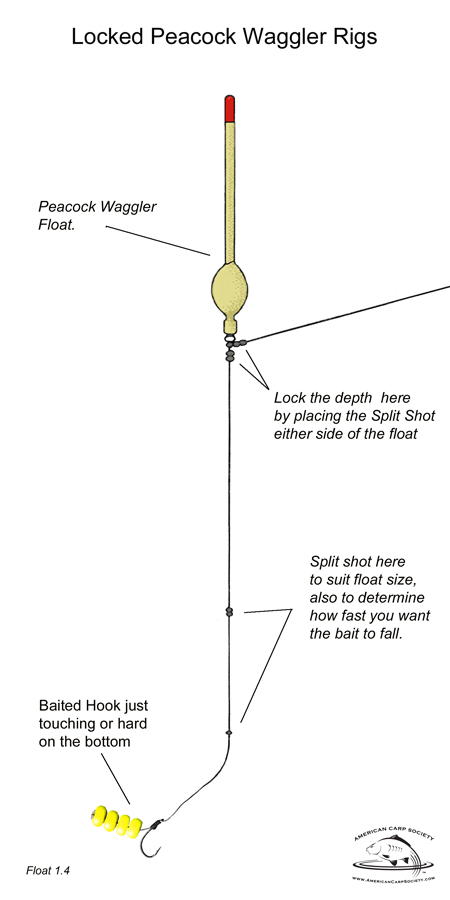
LOCKED PEACOCK WAGGLER RIGS
This float, the 'Peacock Waggler' is used often on bigger still waters and rivers where some turbulence or wind created chop is encountered. Being bulkier than a regular Waggler, it takes more shot to cock and thus can be cast further too.
It's used in these scenarios because the extra buoyancy offered by the float's "bulb" steadies the float in the water during these windy or turbulent conditions. This makes seeing an actual bite so much easier and cuts down on the false bite situations. Another very similar float design is often referred to as the Carp Antenna an is used in the same situations.
This rig is referred to as "locked" because after setting the depth of the float in the area we wish to fish, split shot is then placed either side of the float to lock it into position. Note: Don't put the shots 'skintight' to the float, leave it a little wriggle space, say about a half inch
The main benefit of this approach is that most of the weight needed to cock the float is located at the base of the float with only very small shot need further down towards the hook. This ensures both that the float is always at the correct depth and when cast to the mark we're fishing; the float always arrives tail first with the bait trailing behind it. Especially handy when casting to the edge of overhanging tree branches of reeds etc.
The bait can also be left free to fall through the water column more naturally (on the drop) so making it less suspicious to the carp.